Pages

Showing posts with label Sewing. Show all posts

Sunday, June 12, 2011

PJ's for Nigel

As many of our friends know, we have dinner every Wednesday night with Nigel. Nigel and my husband used to work together on a hardware project for a large software company here in Redmond. *wink, wink* When we returned to our home here my husband called him and said, "Man you have got to be social, we have so many wonderful friends on the East Coast I need to be social with people on the West Coast more or I am going to be miserable." The first week we got back he came for dinner on a Wednesday and that was that. It's been over a year and a half and we have added our son to the mix and now the 5 of us do dinner each Wednesday. It really is great. It breaks up the week and it allows my husband to be social with one of his favorite people. They also kind of work together again and geek speak a lot. Occasionally we invite others to join us, and when we have guests in we've always included Nigel. He's becoming a very good member of the family, and he just so happens to share my birthday! I knew there was something good about him.
Last year for Nigel's birthday we got him a picture of our daughter. He really does need an updated one and one of Ben but I didn't want to start a trend. So I was thinking and thinking about what to get him. When I came up with a great idea. But there was no way I could finish it in time, however I started to do some research to see if I could even find fabric that would match my idea. While doing that Jason says to me, you know you should make some PJ's for Nigel in that Beep Bot fabric if it comes in flannel. There is no way I cannot take a suggestion like that. So of course I immediately switched course and found some flannel Beep Bot! YEAH!!! I ordered way to much of the fabric and it was delivered Tuesday morning before our weekly Wednesday dinner in which we were going to celebrate our birthday's. I somehow managed to wash, dry, iron cut out and complete the project in time for our dinner celebration all while watching both kids, making a cake and making dinner for 13! (Okay 5 of the guests were 2 and under, but I'd rather take credit for the larger number of guests.)
Nigel loved the pj's and they fit perfectly. I however could not get him to model them long enough to take a picture. Bugger. But I took plenty in advance. He said every time he looks at them he laughs and that can't be bad.
The fabric is from a wonderful online store by the name of The Enchanted Room.
Here they are.

Here is the full length view. They are actually the same length I just didn't straighten them on the floor.

Folded in half to see the robots better.

Completely folded so you can see a closer view of the cuffs. 

Friday, May 20, 2011

Gift Set

Here's one of my more recent orders, I just completed. It includes a Baby Cuddle Ribbon Blanket, 1 Bib and 1 Burp cloth in matching fabric. Looks so sweet. For the bib I was able to use my new snap press and the polyacetel resin (plastic) snaps. They work really nicely and my new snap press is a cinch to use! The bib is now adjustable and would fit someone as small as Ben who is just 4 months or Tesla who is over 2 years old. I love these bibs they cover so well and are very soft on the skin. Unfortunately Ben is not the best model, he's a great tester though. There's a few of the same type of pictures just different views of the items.

Burp Cloth, Bib folded, and Baby Ribbon Cuddle Blanket

Burp Cloth, Bib and Baby Cuddle Ribbon Blanket (Minky Dot side up)

Bib and Burp Cloth. Bib is adjustable.

Ben modeling the Bip in toddler size adjustment.

Bib modeling the bib in infant size adjustment.
Baby not included

Wednesday, May 18, 2011

Tuesday, May 17, 2011

Fonts


I have been working on a bunch of embroidery this past weekend. I have a few projects that I'm doing that I'm embroidering names on and so I thought I'd just cut the fabric out and just get all the embroidery done in advance, that way when I wake up in the morning I can just sew and complete rather than design the look still. I decided before doing anything I needed to just break down and do some sampling of the embroidery on my machine. I have tons of fonts but not all of them are great for embroidery. I'll have to do some more but once I did the Garamond I knew it was perfect for a classic serifed font. I also ran out of room on this fabric to do more, so it was a good stopping point. The English 111 is really strange. It's the most cursive looking font, so I thought it would be perfect for embroidering little girls names but it will not make the full capitalized E. Strange right? Not sure what's wrong with it. I have a friend who's daughters name is Elena and I made a little cuddle blanket for her, but then had to redo the top because it wouldn't show that E. Does anyone else have this problem?


Above are some embroidered names on a red Kona Solid for some little boys I know. These are eventually going to turn into pillow cases for them. I don't have Cooper and Cohen's accent fabric yet, so it'll have to wait. I love the way these turned out. Very strong and clear looking. I used the Garamond font.

What are your favorite fonts for embroidery? Do you have a favorite sans serif one? Or cursive one?


Thanks for visiting Tesla's Mom! Don't forget to become a follower so you're up to date on the latest news. Leave a comment, you know it would make my day!

Friday, May 13, 2011

Gnoma Claus by The Happy Zombie

Have I mentioned my love of the The Happy Zombie??? She's a rock star in the sewing world. Seriously. Everyone knows her. She's constantly mentioned in magazines and on other blogs. I learned about her in the fall, while reading a post by the Bolt Neighborhood Blog. I mentioned it back in October here. I love reading her blog. It's really inspiring. The colors are bright and cheery so I always feel uplifted and like I can do anything. Her favorite colors are Red and Aqua, which were my wedding colors. So I feel like we're kindred spirits. I imagine Martha, Monica and I one day chatting over coffee as we take a break from our sewing or crafting. I'm on a first name basis, with all the greats, don't you know? Another cool thing about Monica is that when you comment on a post on her The Happy Zombie blog, she actually writes back to you. Not just a standard, thanks for commenting, she actually writes back personally recalling things you wrote on your comment. Seriously, the first time she did that I just about pee'd my pants. Super excited, I felt so special. Now I kind of can't wait for her to write a new post just so I can comment. *he he he*

Okay so enough gushing.

Last year, The Happy Zombie came out with a really fun Holiday line that included the Gnoma Claus. Well I knew those would make great gifts for Christmas, so I immediately bought a few panels. I quickly did nothing with them. My dreams of completing a bunch of hand made holiday gifts last year were squashed by my pregnancy. I was just tired and uninterested in doing anything. But now I'm not pregnant and I decided to go ahead and start on THIS years holiday gifts!


This morning I made the first of many pot holders! I also want to make cute little pillows with this. I find the Gnoma Claus to be just adorable! Thanks Monica for creating something that is just well.... Happy!

Monica, along with the other rock stars are in Salt Lake City at Quilt Market. I am so looking forward to reading all the reports about it. You can see the button for the KPKM radio on the right side of my blog. That's Pam from Pam Kitty Morning who organizes all the reports and does fun videos at Quilt Market. She's another rock star. Both Monica and Pam have new lines of fabric out, you can check out their postings about them here and here

Well that's enough for me for one morning. I need to go eat breakfast before the rest of the house wakes up!

Thanks for reading along! Leave a comment and become a follower! You know it would make my day!!!


PS: Thanks Blogger for deleting my first posting and making me rewrite this. Thank goodness I subscribe to my own blog in google reader and could just copy and repost. 

Tuesday, May 10, 2011

Pillows

Recently we've been trying to move T into the big girl bed. Our attempts have not been working. But in the mean time we set up the big girl bed with a pretty cat quilt and cat pillow case cover.


My mom had this quilt made for me when I was a little girl. It's in fantastic shape, it looks brand new. When we I was looking into bedding for T's bed I was just shocked at all the pricing and the fact that everything was either girlish or boyish. I didn't want anything that was to girlish because she'll be sharing her room with her little brother at some point. Hence the trying to get her into the big girl bed.

Anyway, she won't sleep in it. But she will sleep with her cat pillow case cover. Which is a problem, because it's a pillow case cover not a pillow case. It's comfy but it's at least 25 years old and looks great and I would prefer it didn't get ruined by little mouths and oily faces. (I'm well aware that it will most likely be ruined anyway.) She would also pitch a fit if we tried to give her something else though, so what happens if the pillow case cover is in the wash for nap or bed time. Or she gets sick on it and I can't just rewash it. I knew I needed something different. Something she'd be excited about sleeping on. I took her to the store and showed her the Toy Story and Disney Princess sheet sets and I asked her which one she'd like. She just said "No Woody, No Princess." Great. Then I decided I'd make a pillow case for her. I found this beautiful fabric, which was out of my price range for a pillow case that I wasn't sure if she'd like or not.

So I went to Joann's. I found some really cute fabric of, princesses walking dogs and doing other things, cute cats and colorful stars. I've only used the princess fabric so far but she loves the pillow case and is using it. So I'm happy. Here are two versions of it.


I have to credit my husband with the idea of the second one. I was complaining that I had a bunch left over but not enough to do a whole pillow and this is what he came up with. It's my first pieced thing. I'm pretty excited about it. T is sleeping on the first pillow, the second one I made for a friends daughter. I need to make one for her son too, and then I'll send it off.

Friday, May 6, 2011

Spring Top Sewalong Entered!

The top has been accepted and entered. I also found out the name of the floral print. I emailed the folks over at Pacific Fabrics. Annette and Michelle got back to me. Michelle said that the print is called Floral Lawn Print Plum. It's not part of a specific line but it's lovely just the same! Pacific Fabrics got back to me really quickly! I really appreciate it their help! Thanks Michelle!
Rae over at Made by Rae (the host of the Spring Top Sewalong) has posted some of the prizes for the Sewalong. There's a lot of really cool packages. I love all the bows, patterns and fabrics. It's really nice that I had never heard of any of the companies either so even if I don't win I get to learn about new businesses that I clearly need to know about! Check out these bows by Bird Song Bows!

How pretty are they? I have a few friends with little girls who these bows would look amazing in. Well and Tesla of course.

Also apparently there is going to be a Reader's Choice Winner.... My goodness, now I'm nervous. I wasn't so nervous until I realized people are actually going to be looking and judging the top. Yikes! You should go over to the Flicker Pool and check out the other entries. There's some really amazing tops. A lot that people made up on their own. My goodness I wish I could do that. Check them out here. I'll find out how you go about voting and update next week once it starts.

Oh, I also wanted to mention that Fabric Flair is having a huge sale right now. Most everything is under $7.00 a yard. I bought some really great auto inspired fabric by Riley Blake. Check it out!


I know that I'm going to make some fun stuff for Ben with this!


Thanks for visiting Tesla's Mom! Leave a comment!

Thursday, May 5, 2011

Spring Top Sewalong: A Completed Top!

Well I did it! I have to say I'm proud of myself every time I finish something. Usually I make things with no particular deadline, or perhaps a birthday or holiday deadline, but for the Spring Top Sewalong is different. Perhaps because I have been reading all about these amazing sewers and quilters for awhile now and they all seem to have this great community in which they share and create things together, and with the entry into this I'm joining in on the fun and not just sitting on the side lines. Or maybe because I am feeling like I am not getting anything done and to pick a pattern, buy the fabric and sew a top that looks pretty darn good on me within any given time crunch is, well, satisfying. The pattern I used is from NEWLOOK or Simplicity #6937. I used a Robert Kaufman Solid Plum for the yolk and unfortunately the patterned fabric name is not correct on the receipt.
Without further ado, here is my Spring Top for the Spring Top Sewalong hosted by Made by Rae.


I had all these grand ideas that I would do my hair and makeup before Nigel came over to take the picture. But then everyone in my family got sick with over 100 degree temperatures. So I ended up handing Ben to Nigel when he got here to hold while I changed, then coming back in and handing Ben to Jason who was about to throw up at any moment. Then ran outside took the pictures, ran back in changed back into sweats and grabbed Ben from Jason who just about fell over. So the fact that I'm laughing in this picture makes me smile.


I like this one, I'm striking a pose... Or showing off the cool sleeves. I really like the feel of them. They are very light and airy and cover my arms nicely.


This is the official entry photo. The entry is supposed to just show off the shirt. So the head and legs came off.
What do you think? Leave a comment!

Would you like to see the other tops entered?  Go ahead and check out the Flicker group, here.

Tuesday, May 3, 2011

Spring Top Sew Along Progress Part 2


I added the yoke/collar to the top that I am making for the Spring Top Sew Along hosted by Made by Rae. I ended up not following the directions on the pattern and making it up as I went along. I can't believe I got it on. The fact that it doesn't look right and that it eventually needed to be pulled off completely and redone is beside the point. I actually just got it on all by my lonesome. The reason that I did it was because the directions made no sense to me. Really no sense. It was like they were written in a foreign language I just couldn't decipher them. I googled the pattern and with the exception of one person no one else thought they made sense either. So I didn't feel to bad about my skills.
The issue with the yoke and the reason I pulled it off was because of that puckering at the right breast. It doesn't do that on the other side and I thought it didn't look right. Also look at the side view.


See that? The yoke is falling backwards off the shirt. Not exactly the look I'm going for. The bad news is I ended up getting a great idea to fix it at four o'clock in the morning and then whatever it is that I did ended up looking so much worse. That's when I pulled the whole thing apart and started over.

The shirt is officially done. But our friend Nigel is coming over tomorrow night for dinner and he's going to take pictures. There is a very specific way that the picture needs to be taken and I also want the color to show through correctly. I would have my sister do it because she's an awesome photographer but I want the pictures NOW, and since it's not a really serious thing I hate to ask her to come right over and take the pictures. Not sure if I will post them here first or on the contest site first. The shirt looks great though and I'm really proud of it.

Monday, May 2, 2011

Snap Press

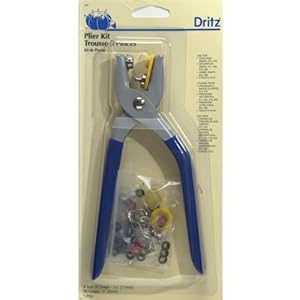
Does anyone have a snap press? I do a lot with snaps. I make a lot of bibs and I prefer snaps to Velcro because little ones can't get them off without help, and as a friend put it, Velcro tires. I used to use this thing that required that you hammer the snap into place, which you can imagine is really annoying when it doesn't work right. Now I use the Dritz Plier kit.


It works great, but again I do a lot of snaps and sometimes it can take several attempts before it goes in correctly.

I'm thinking about getting this:

That really looks like it would do the trick... Anyone have any opinions?

Friday, April 29, 2011

New Fabric

So I got some new fabric yesterday! A friend asked me to make a gift for her to give. She ordered the fabric plus a couple of yards of Ann Kelle fabric for me. Below is just a picture of the stuff that is for her project. It's really cool that she asked me to do this. It's a pretty special project but that's all you're going to get from me! I'll update with details in the future!


I also just have to say, that my friend who picked out the fabric claimed to not know what to get, and so I sent her a bunch of links to different fabrics that I liked. I didn't even notice this and it is gorgeous! I absolutely love it. So please, like you don't know what to get! Really I think she should have gotten dinosaurs, but zoo animals are awfully cute! (Okay that last bit was a private joke. I can explain again later, when all is revealed.

Thursday, April 28, 2011

Spring Top Sew Along Progress

Well as you know I have been working on the Spring Top Sew Along hosted by Made by Rae. It's a bit slow going since I have to do during nap the kids nap times but progress is being had just the same. Yesterday I cut all the fabric out. Ben started waking/crying just as I was finishing up. I was cutting so quickly at the point, I wouldn't be surprised if I made a mistake!
Today I managed to sew the bottom part of the dress up. Basically everything but the yoke/collar. Here's a picture of the progress so far.


Okay, first let's just get it out of the way, that is my bra showing through and if anyone thinks my flopsy nursing bra is risque more power to them. Other than the bra though, it's looking pretty good. At least it's not to small, and the color is good. Now on to the yoke!

Tuesday, April 19, 2011

Fabric for Spring Top Sew Along

I bought the fabric for the Spring Top Sew Along that is being hosted by Made By Rae. I got the fabric at Pacific Fabrics in Bellevue. They are so helpful there. I brought 5 bolts, one at a time, to the counter, to ask their opinion and because I found something better at the last minute. I could only carry so much with me since Ben was in the car seat and boy has that gotten heavy. Anyway, one fabric is a solid and the other is a print. The print will be the dominant fabric and the solid will be just around the color.


I am really into purples lately. I just love the color saturation of it all, and I think that with the pattern it will look really great. Let's hope! I unfortunately only know that the solid is by Robert Kaufman and is called Ultra Sateen Plum. The pattern I am hoping to figure out but the receipt states that it is a a Moda Marbles Red Hot and it's not that. They also under charged me. It's funny because I was thinking wow that was cheap, and then later in the car I was thinking wow, 2 1/8 of fabric at 8.99 a yard plus the other 5/8 yard really was inexpensive. But now that I look at it I realized they totally undercharged me. In fact I'm not sure what they were looking at when they totaled it up. Weird. I feel bad that they undercharged me, I hope I got the right amount of fabric, I better go measure that solid.

Monday, April 18, 2011

Spring Top Sew Along

Hey did I tell you, that I'm going to do my first Sew Along? Made by Rae, one of my favorite blogs is hosting a Sew Along. It's a top just for you, eh well for me really. But it can't be for the kids or for my mom or for Jason it has to be for me! I went to the fabric store today to get the fabric. It's in the wash right now, but I'll show pics tomorrow. Can't wait to get started. Go check out the blog Made by Rae,  I just love it.You can find all the Sew Along Rules and submission requirements there. I have until May 9th to get it done. Wish me luck!

Sunday, April 17, 2011

Orders?!

So last week I made a little snuggle blanket for Ben and a few of my friends who have had babies recently. Seems like everyone is having babies. I had this Minky Dot fleece that is so beautiful and I didn't know what I was going to do with it. I had overbought previously for a project for Tesla that failed miserably. (Turns out Minky Dot fleece and regular fleece combined makes a very heavy cape.) Must remember to tear that out and reuse the fabric.

Here is the blanket I made for Mr. Ben. It's only 10x10 but it's super cute, and I love it. Which is the most important thing. He would like it if I drew a big smily face on it.


The flannel is from a fabric store in Portsmouth, NH. But I don't know who it's by. I just love it though. Does anyone know?


I embroidered his name on the Minky Dot side. 


This is my best fashion shot. What do you think?

Anyway, I made one for Ben and then one for his cousin... Then it just got crazy. I was looking around and realized I had pink fleece on hand and this super pretty paisley fleece I bought over 9 years ago to use as a table cover for my sisters baby shower. So I combined those and made:


This one is for Tesla, but then I made 5 more for other friends who had girls. I still have to finish one, but what fun! The best part is after I made these friends started asking me, could I make such and such for their kid, or friend. So I said sure! Now I have 4 orders placed since last week of different items that I get to make. I'm super psyched. Since I can't really afford to buy fabric that I want, I've been having them add fabric on to their order in the patterns that I've been coveting. Ann Kelle was definitely up there on the list. Pretty soon I'm just going to have to price things out though, because I just can't be buying fabric without repurchasing the other materials I need too. I was telling Jason if I could somehow figure out how to make $10000 in one year, I could maybe get that sewing machine I really want, and that would be so cool. One to pay for it myself and two to be doing so much business. Hmmm dreams. 

Friday, April 15, 2011

Baby Gifts

Recently, I have actually been able to sew again! I've made some super cute little snuggle blankies for my kids and some friends who recently also had children. (Seems like when you are at the age that I am now, there's always a new baby being born.) I also made a bunch of burp cloths and bibs. The bibs took about 3 months to cut and sew and that's for only 40 bibs so I kind of took my time on those. Below is a package I sent to a friend, it's pretty much identical to one I sent to my cousin too.


You can't tell but the box is from Omaha Steaks. It was the perfect size box and I thought it would be funny. Hopefully she and my cousin do too!

Saturday, November 6, 2010

Fun Sewn Cloth Baskets

Recently, I found a blog that gives the directions of how to make a "Stash Basket". I had seen these before in a magazine or something and had always wanted to make them. The blogger used some pretty nice fabric, it was a much heavier weight fabric than what I wanted to purchase. I also wanted to make these for my daughter and sons toys and clothes, so I wanted to make them in fun colors, cheapish fabric and I wanted to make a few of them. So I took PurlBee's directions as inspiration and did a couple of modifications and made eight for the kids. They cost about $45 for 8. I just love them and showed them off to friends who wanted clearer directions. So I took some pictures and wrote up the directions below. I hope they are clear enough for everyone, let me know if you have any questions!


Materials:
1 yard of patterned quilting fabric, for outside*
1 1/2 yards of solid color contrasting fabric for inside of basket and bottom (I used an inexpensive polka dot)
3 yards of medium weight fusible interfacing**
thread

*I wanted a really nice patterned fabric and so I spent about $10.00 per yard on this, so I wanted to figure out a way to not use to much of it on the basket while still having a great effect.
**You can get this at any fabric store. It's approximately $3.00 a yard at one store I went to, but if you shop around you can get it for cheaper. It's also sold in different manners. At Pacific Fabric, it's not sold off of a full size bolt, so you'll need to calculate this out correctly for your individual needs. I happen to have had a roll of 12 wide interfacing that I used. The product is called Heat N Sta by Floriani, you can ask the clerk at the fabric store though for the best thing to use.


Directions: (this makes quantity 2)


1. Cut  fabric. With the patterned fabric folded in half cut 2 12x36 inch strips, this will be the outside of the basket. Cut 2 12x36 inch strips of the solid color fabric. Then cut 4 12 inch diameter circles of the solid fabric. I used a bowl that I had to create the circle and traced around it with chalk. It was very easy. You save money by using the solid fabric on the bottom of the basket instead of using the patterned fabric.


2. Iron on the fusible interfacing on to each piece of the basket. Both the solid and the patterned fabric and each side of the circles. (This helps the fabric to be stiff for basket.


3. Sew the disks together with right sides together, leaving an opening for turning the fabric inside out.


4. Sew one each of the 2x36 patterned fabric to the 2x36 solid fabric right sides together, leaving one end open.


5. Turn the disk inside out, pin opening shut and iron. 


6. Turn the strip inside out, being sure to get the corners, and iron, folding the opening in, and pin if necessary.


7. Sew around the outer edge of each sewn ironed piece. 


8. Pin the strip to the basket.


9. Sew the strip to the basket, I tried to stay along the line that I had used to sew the two strips together so that there was not an extra sew line.


10. Pin the vertical seam together and sew. 


11. Since on mine there was an overlap I sewed about one inch down on the overlapped section to keep it from flapping when the edge was folded over.


12. Fold edge over and fill with toys.


I hope you find these directions helpful. It's the first time I have written directions for sewing so I would not mind any kind critiquing. It was harder than I had anticipated and I'm pretty tired this evening so hopefully everything is coherent.